Overview
- Purpose: If a tenant cannot make a payment in full and the Property Manager, or Owner, is willing to accept partial payments with the tenant, then they can create a payment plan.
- Target Audience: Tenants, Property Managers, Owners, and Employees.
Step-by-Step
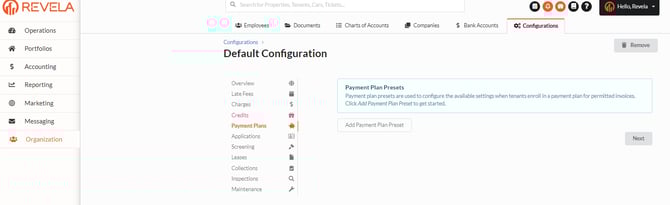
Creating a Payment Plan Preset
The first step in setting up a payment plan is to create a Payment Plan Preset.
- Go to Organization > Configurations and go to Payment Plans:
-
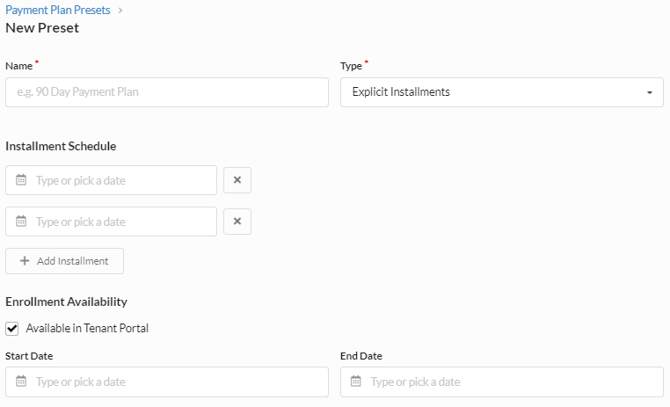
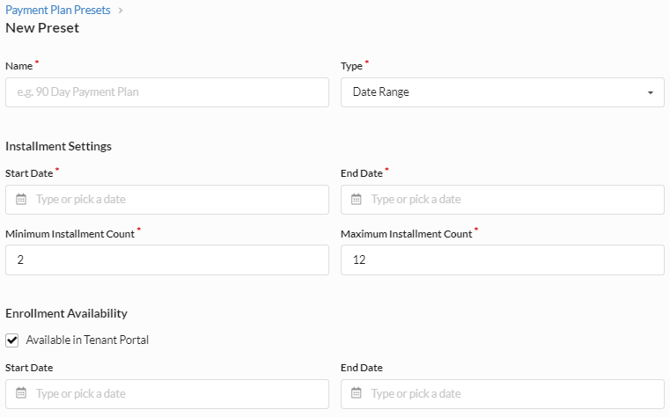
Enter the name of the Payment Plan Preset. This description is what will be displayed to tenants when they select a payment plan.
-
Select a Type. There are 3 options:
-
Explicit Installments - This type allows you to select specific dates that you would like payments to be made. The amount will be evenly divided between the installment dates entered.
-
-
-
-
If a tenant signs up for an Explicit Installment payment plan after an installment has passed, their amount will be divided between the remaining installments available. Please note, if a tenant select this plan type the day of an installment, that installment will be skipped. They must enroll the day before an installment date for it to be included.
-
-
-
-
Date Range - This type allows you to enter in a start and end date along with a minimum and maximum number of installments. The amount of the plan will be evenly divided by the number of installments selected. The dates of each payment will be evenly spaced within the date range starting with the start date as the first installment date
-
-
-
-
If a tenant signs up for a Date Range payment plan after the Start Date, the first installment date will be the next day and each subsequent installment will be spaced evenly in the date range remaining.
-
-
-
-
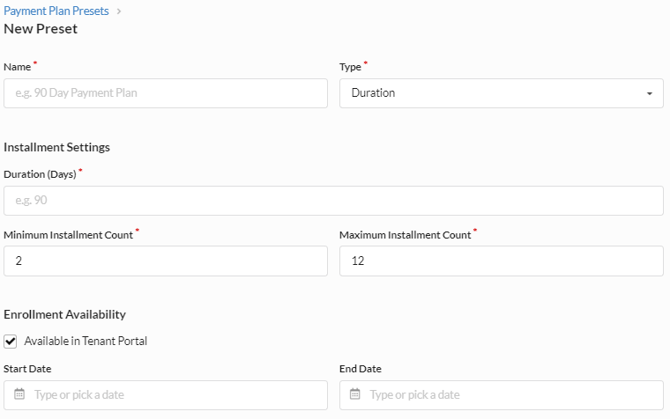
Duration - This type allows you to select how long a plan should last and the number of installments within the plan. The first payment date of a Duration will always be the next day and the plan will last the number of days entered as the duration from that first payment date.
-
For example, if the duration is 90 days, the number of installments is 3, the second installment would be 30 days later (90 divided 3), and the third installment 60 days later.
-
-
-
Choose whether you would like tenants to have the option to select the Payment Plan via the checkbox “Available in Tenant Portal”.
-
If this is unchecked, only people with employee access will be able to enroll a tenant in a payment plan.
-
If this is checked, tenants will be able to enroll in the plan via their Tenant Portal.
-
-
You have the option to enter in dates for when the plan should be available to tenants.
-
For example, you may want tenants to sign up for a plan before a certain date. To do that, you can enter an End Date for the plan's enrollment availability. If this is left blank, it will remain available until updated or the plan preset is deleted.
-
Making Invoices Eligible for a Payment Plan
There are two ways to make an invoice eligible for a Payment Plan:
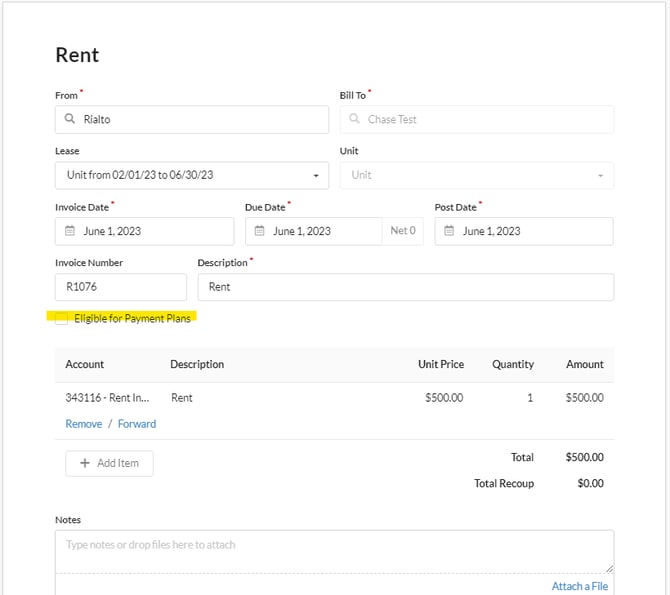
- Click the checkbox “Eligible for Payment Plans” for an individual invoice that has been already billed to the tenant
-
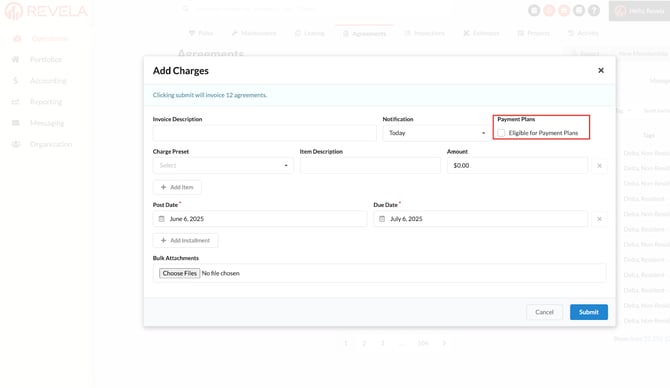
When bulk billing the tenants through Agreements tab-> Select the members Add Charges -> Then select “Eligible for Payment Plans”
- This will make invoices eligible for payment plan for every member/tenant that has been billed for this invoice
Tenants Enrolling in a Payment Plan
Tenants can enroll in a payment plan in two ways.
Option 1:
-
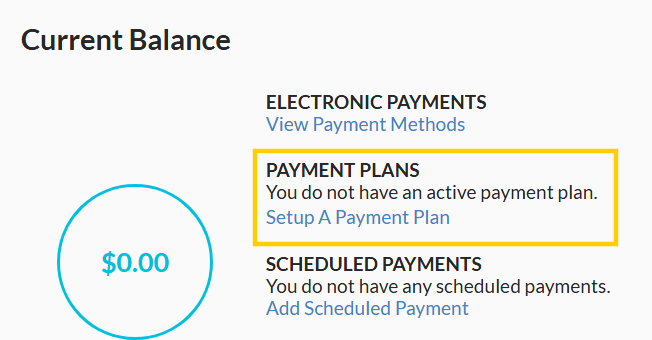
Click “Set up Payment Plan” in the center of their home page
-
Select the charge(s) they want the payment plan to cover, the plan they wish to enroll in, set the number of installments (if there are options), and the payment method they wish to use.
Option 2:
-
Go to their Charges tab by clicking the circled number on their home page or by clicking Charges on the left hand side of their portal.
-
Click the charge that they wish to sign up for a payment plan.
-
Click the “Setup Payment Plan” button in the upper left.
-
Select the plan they wish to enroll in, set their number of installments (if there are options), and the payment method they wish to use.
Please note: A payment plan preset must be created and available and the invoice selected must have been made eligible for a payment plan.
Removing a Payment Plan
If tenants would like to cancel the payment plan that has already been created, you can cancel it by going to Dashboard -> View Payment Plan -> Terminate
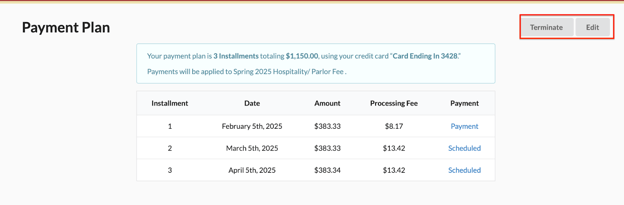
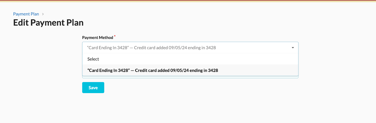
Changing a payment method used for a Payment Plan
- First add your payment method you would like to switch to use by going to Account -> Payment Method -> Add Payment Method.
- Then change the payment method on the payment plan by going to Dashboard -> View Payment Plan -> Edit -> Select the new payment method.