
Adding a Pet from the Tenant Profile
Pets are managed from the tenant’s profile page. When a pet is added, it is automatically linked to the tenant’s current lease (if one exists), which causes it to appear in the Pets section of the lease summary.
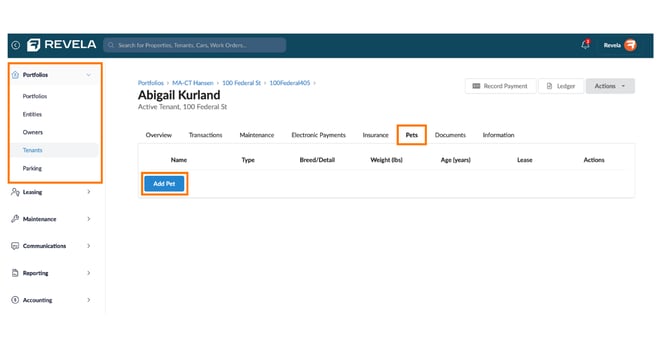
- Navigate to Portfolios > Tenants in the left sidebar.
- Find and click on the tenant you want to add a pet for.
- On the tenant profile page, click the Pets tab.
- Note: The Pets tab is only visible if you have the appropriate permissions for pet management.
- Click the Add Pet button.
- Fill in the pet details:
- Name (required) - The pet’s name.
- Service Animal - Check this box if the pet is a registered service animal.
- Type (required) - Select the pet type from the dropdown: Cat, Dog, or Other.
- Breed (required for cats and dogs) - The pet’s breed. This field is hidden when “Other” is selected.
- Color (required for cats and dogs) - The pet’s primary color. This field is hidden when “Other” is selected.
- Detail (required for “Other” type only) - A description of the animal type (e.g., “Rabbit”,“Hamster”). This field only appears when “Other” is selected as the type.
- Approximate Weight (lb.) (required) - The pet’s weight in pounds.
- Estimated DOB (required) - The pet’s estimated date of birth. Revela uses this to calculate and display the pet’s age.
- Click Save. The pet will be added to the tenant’s profile and automatically associated with their current lease.
.png?width=670&height=352&name=Pet%20Pics%20for%20KB%20(1).png)
Viewing Pets on the Lease Summary
Once a pet has been added to a tenant and linked to a lease, it will appear in the Pets section of the lease summary.
- Navigate to the lease summary by either:
- Going to the tenant’s profile under Portfolios > Tenants, then clicking the lease link in the Overview tab, or
- Going to Leasing > Agreements and searching for the tenant selecting the lease.
- Scroll down on the lease summary page. The Pets section appears below the Contacts section and above the Charge Schedule.
- The Pets section displays a table with the following columns:
- Name - The pet’s name
- Service Animal - Yes or No
- Type - Cat, Dog, or Other
- Breed/Species - The breed (for cats/dogs) or detail description (for other types)
- Color - The pet’s color
- Weight (lb.) - The pet’s weight
- Age (years) - Automatically calculated from the date of birth
Note: The Pets section only appears on the lease summary when at least one pet is associated with the lease.
.png?width=670&height=352&name=Pet%20Pics%20for%20KB%20(2).png)
Editing or Removing a Pet
To update or remove a pet from the tenant’s profile and lease:
- Navigate to Portfolios > Tenants and select the tenant.
- Click the Pets tab.
- In the Pets table, use the action links on the right side of each row:
- Click Edit to open the pet form modal and update any details.
- Click Delete to remove the pet. You will be asked to confirm before the pet is removed. Once deleted, pet information cannot be retrieved so please verify before deleting.
.png?width=670&height=352&name=Pet%20Pics%20for%20KB%20(3).png)
Important Notes
- When you add a pet through the tenant profile, it is automatically linked to the tenant’s current active lease. The pet’s lease move-in date is set to the lease’s start date.
- If the tenant does not have a current lease at the time the pet is added, the pet will be saved to the tenant’s profile but will not appear on any lease summary until a lease association is established.
- The Pets tab and the Add Pet, Edit, and Delete actions are only available to users with the appropriate permissions.
- Pets added during the online lease application process are also linked to the applicant and will carry over once a lease is created.