Overview
-
Purpose: This guide explains how to create and customize admin roles in Revela using Role-Based Access Control (RBAC).
-
Target Audience: Property managers, financial administrators, and system administrators managing user roles.
1. Introduction to Admin Roles in Revela
Revela allows custom role creation to ensure that each team member has access to relevant features while maintaining security and control over system functions.
✅ Why Use Custom Roles?
-
Restrict access based on job responsibilities.
-
Prevent unauthorized changes to critical financial or operational data.
-
Ensure interns, agents, and external staff only access necessary information.
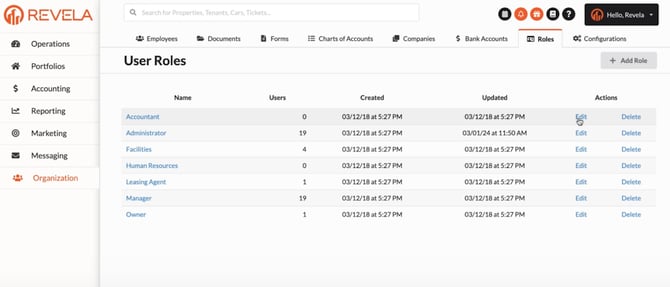
2. Default Roles Overview
Revela provides defaults roles, including:
-
Accountant – Manages financial transactions and reporting.
-
Administrator – Full system access.
-
Facilities – Handles maintenance and operational tasks.
-
Human Resources – Manages employee records.
-
Agent – Access to tenant interactions and leasing activities.
-
Manager – Oversees operations and financial performance.
-
Owner – Property owner-level access to financials and reports.
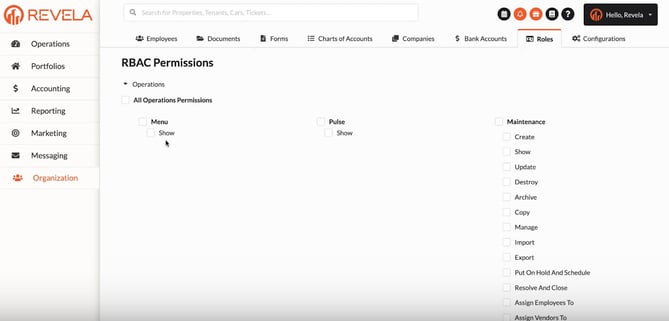
3. Understanding RBAC (Role-Based Access Control)
What is RBAC?
RBAC is a new feature that enables administrators to:
-
Customize which menus and tabs are visible for each role.
-
Assign granular permissions based on job duties.
✅ Example Scenario:
A property intern assisting with administrative work should have access to leasing agreements but not sensitive financial data. With RBAC, you can grant limited access to specific functions without exposing confidential information.

4. Customizing Role Access
✅ Key Areas to Customize for Each Role
Admins can configure access to specific menus, such as:
-
Operations – Day-to-day property management tasks.
-
Portfolios – Portfolio-level financial and property data.
-
Accounting – Invoices, transactions, and payments.
-
Reporting – Financial and operational reports.
-
Marketing – Listings and lead management.
-
Messaging – Internal and tenant communications.
-
Settings – System preferences and configurations.
-
Organization – Company-wide employee and role management.
5. Step-by-Step Customization Process
-
Navigate to Settings > User Roles in Revela.
-
Click "Create New Role" or select an existing role to edit.
-
Assign the necessary permissions based on responsibilities.
-
Choose which menus and tabs will be visible.
-
Example: Creating an Intern Role
-
✅ Grant access to Leasing & Messaging.
-
❌ Restrict access to Financial Reports & Accounting.
-
-
Save the role to apply changes.
🎯 Flexibility: You can either grant full access to a module or limit access to only certain actions (e.g., allowing lease viewing but not lease editing).
6. Best Practices & Tips
✔ Use predefined roles as a starting point and modify based on job functions.
✔ Restrict access to sensitive data like financial transactions unless necessary.
✔ Regularly review role permissions to ensure proper system security.
7. Common Issues & Troubleshooting
Issue 1: User Cannot Access Certain Features
-
Solution: Check the RBAC settings and confirm the required tabs are enabled for the role.
Issue 2: Role Changes Not Saving
-
Solution: Ensure all required fields are completed before saving.
Issue 3: User Has More Access Than Intended
-
Solution: Double-check that the correct menu options and actions are assigned.