
Navigating the Accounting Section
The Accounting section in Revela is accessible from the main navigation menu under Accounting. It serves as the central hub for all financial activity and is organized into several key areas, each designed around a specific part of the accounting workflow. These areas include:
-
Payables - This section is where you manage bills you owe to vendors, owners, and other parties. This includes entering invoices, organizing them into payables batches, and processing payments.
-
Receivables - This section is the counterpart of Payables; it is focused on charges billed to tenants (or other parties) and the payments collected against those charges.
-
Payments - This section offers a consolidated view of all payment activity, including electronic payments, checks, and refunds.
-
Journals - This section gives you direct access to the general ledger for each entity, allowing you to create manual journal entries, review account balances, and control period locks.
- Budgets - If your organization uses budgeting, the Budgets section lets you create and manage property budgets across active, future, and previous timeframes.
- 1099s - Finally, the 1099s section supports year-end NEC-1099 and MISC-1099 tax form preparation for vendors and owners who meet reporting thresholds.
Each of these areas works together to form a complete accounting workflow. Understanding how they connect is the key to working efficiently in Revela.
---
Understanding Payables and Receivables
Payables and receivables are the two sides of Revela’s invoicing system. While they share many of the same mechanics, they serve opposite purposes and are accessed through separate sections of the platform.
Payables: What You Owe
Payables represent money your organization owes to vendors, contractors, owners, or other parties. When a vendor submits a bill for maintenance work, or when owner disbursements are generated, those obligations appear as payable invoices. You can find all payable invoices by navigating to Accounting > Payables.
The Payables index provides filters to help you manage a high volume of invoices. You can filter by approval status, batch assignment, portfolio, and whether an invoice has attachments or receipts. The approval filter is particularly useful if your organization requires invoices to be reviewed before payment. Options include viewing invoices that are approved, unapproved, or specifically needing your approval.
Payable invoices flow through a straightforward lifecycle. Once entered, an invoice may need to be approved (depending on your organization’s settings). After approval, invoices can be added to a payment batch, and the batch is processed to generate payments. Alternatively, you can pay individual invoices directly using the Actions > Pay option on an individual invoice without batching.
Receivables: What Is Owed to You
Receivables represent money owed to your organization, typically by tenants. Rent charges, utility pass-throughs, late fees, and other tenant-facing charges all appear as receivable invoices. Navigate to Accounting > Receivables to view and manage them.
The Receivables index lets you filter by date range, seller (property), and status. Status options include Open, Closed, Paid, Unpaid, Due, Overdue, and Waived, making it easy to identify which charges still need attention. Receivable invoices move through their own lifecycle: they start as unpaid, become overdue if the due date passes, and are marked as paid once payment is recorded or as waived if the charge is forgiven.
Dual-Entry Accounting Payables & Receivables
Revela is a dual-entry accounting platform. Essentially, this means that ledgers for both the property management company and the managed entities are maintained simultaneously. This means that a single invoice can live within the Payables section and the Receivables section at the same time. For example, an owner disbursement invoice is a payable invoice for the property management company, while it is a receivable invoice for the owner/property. Therefore, it is normal and expected behavior for the invoice to appear in both areas!
---
Creating Bills
Creating a bill in Revela follows the same general process whether you are entering a payable or a receivable. The difference is the direction of the charge: payables are bills your organization receives from other parties, while receivables are bills your organization sends to others such as tenants.
Entering a Payable Invoice
To create a new payable invoice, navigate to Accounting > Payables and click Enter Invoice. The invoice form is divided into several sections that guide you through the entry.
-
The From field identifies the vendor or party the bill is from, while the Bill To field identifies the entity being billed (typically a property or your management company). Both fields use a search bar that lets you quickly find the correct party by name.
-
The date section includes an Invoice Date (when the vendor issued the bill), a Post Date (when the charge should be recorded in your accounting), and a Due Date (when payment is expected). The due date defaults to Net 30 from the invoice date, but you can adjust it as needed.
-
Enter the vendor’s Invoice Number for reference, and provide a Description that clearly identifies what the bill is for.
-
The line items section is where you record the actual charges. Each line item requires a general ledger Account, a Description, a Unit Price, and a Quantity. Revela calculates the total for each line automatically. You can add as many line items as needed to capture the full bill.
-
Notes or Attachments can also be added to provide additional context and detail for later reference or audit tracking purposes.
After inputting all required details, click Save to create the invoice. If you have additional bills to enter, use Save and New to immediately start a fresh form, or Save and Copy to duplicate the current invoice as a starting point for a similar bill.
Payable invoices can also be added directly from a vendor profile by navigating to the Vendor Profile > Actions > Enter Invoice.
Creating a Receivable Invoice
To create a receivable invoice, navigate to Accounting > Receivables and click Create Bill. The form is nearly identical to the payable invoice form, but the roles are reversed. The From field is, in most cases, a property or company, and the Bill To field is the tenant or party you are charging. The same line item structure applies, with receivable-specific general ledger accounts available in the account dropdown.
---
Working with Payable Batches
Payable batches are a powerful way to organize and process multiple payable invoices at once. Rather than paying each invoice individually, you group invoices into a batch, configure payment details, and process the entire batch in one step.
Creating and Populating a Batch
To create a new batch, navigate to Accounting > Payables, click Batches, then click New Payment Batch. Give the batch a descriptive name and save it. The batch starts in an Open status, meaning you can still add or remove invoices.
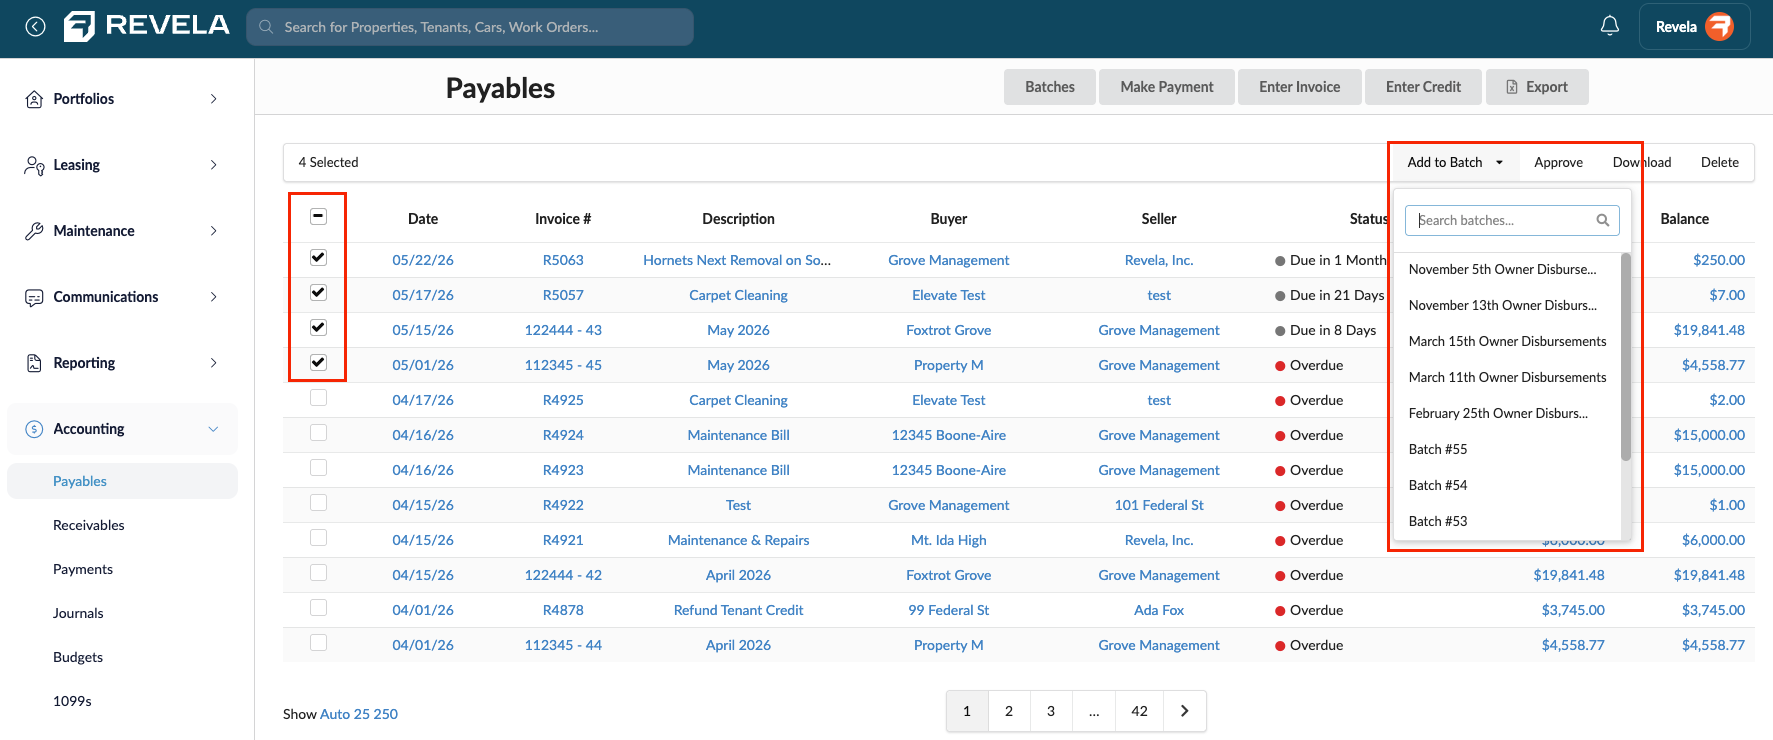
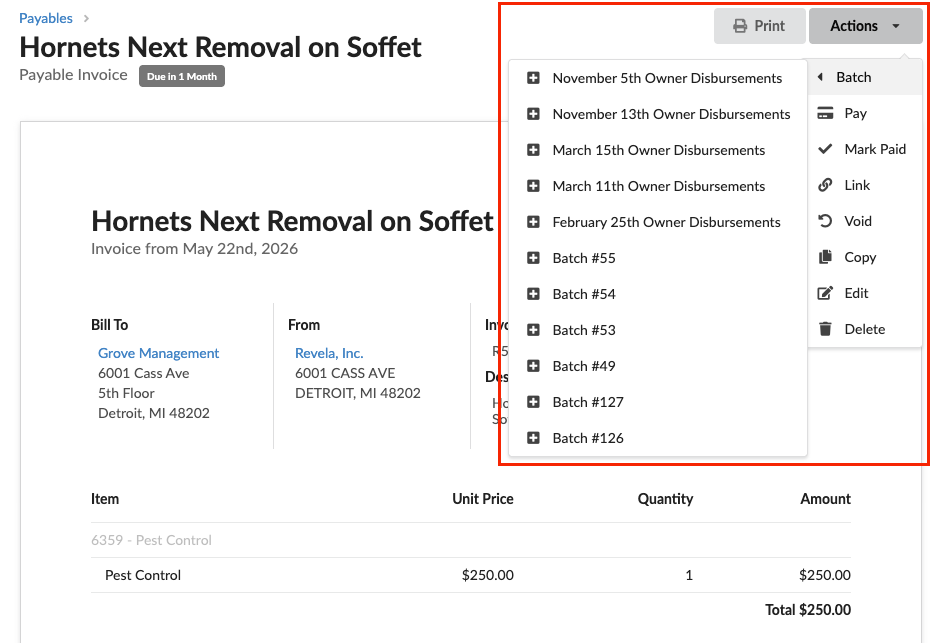
There are two ways to add invoices to a batch. From the Payables index, select one or more invoices using the checkboxes and use the Add to Batch action in the toolbar to assign them to an open batch. Alternatively, from an individual invoice’s detail page, use the Actions menu and select a batch from the Batch option.
From Payables Index
From Individual Invoice
Configuring and Processing a Batch
Once your batch contains the invoices you want to pay, navigate to the batch detail page (Payables > Batches > Select a Batch). Revela organizes the invoices by payer and payee pairs. For each pair, you select the Bank Account to withdraw funds from and the Payment Method to use.
Available payment methods depend on your organization’s configuration and the payee’s setup. Common options include Print and Mail a Check Myself (you handle printing and mailing), Bank Transfer (ACH) (electronic payment sent directly to the payee’s bank account, typically arriving in one to two business days), and Mail a Check for Me (Revela generates and mails a physical check on your behalf. Note that addresses must be verified for automatic check mailing, and Postgrid must be turned on for your Revela instance). If both parties have linked bank accounts via Revela’s embedded banking solution, Instant Pay is also available for instant transfers.
When all pairs are configured, click Process Batch to generate payments and close the batch. Once processed, the batch status changes to Processed and payments appear in the payments section of the batch detail page. For check payments, a Print Checks link becomes available at the bottom of the batch detail page so you can print the checks directly.
Note: If your organization requires invoice approval before payment, all invoices in the batch must be approved before processing. You can approve invoices in bulk from the batch detail page using the Approve action. Unapproved invoices will appear highlighted yellow on the batch detail page.
---
How Journal Entries Work
Journals in Revela represent the general ledger for each entity. Every financial transaction, whether it originates from an invoice, a payment, or a manual adjustment, is ultimately recorded as a journal entry. The Journals section gives you direct access to view, create, and manage these entries.
Viewing Journals and Entries
Navigate to Accounting > Journals to see a list of all journals. Each journal corresponds to an entity. Click on a journal to view its accounts and balances. From the journal detail page, you can drill into individual accounts to see their transaction history and click Add Journal Entry to create a new entry.
Creating a Journal Entry
The journal entry form includes a Memo field to describe the purpose of the entry and a Date field for when the entry should be recorded. You can optionally assign the entry to a specific Property if the transaction relates to a particular asset. Note that requiring a property on journal entries is a configuration setting that can be found under Accounting > Journal > Select a Journal > Actions > Edit.
The core of the entry is the amounts section, where you add one or more debit and credit lines. Each line requires a general ledger Account and either a Debit or Credit amount. The form tracks running totals for both sides, and the entry must balance (total debits must equal total credits) before it can be saved.
Additional options include a Basis setting (All, Accrual Only, or Cash Only), a Closing Entry checkbox for year-end entries that affect retained earnings, and a Reverse Automatically checkbox that creates an automatic reversal of the entry. File attachments can also be added for supporting documentation.
After completing the form, click Save to post the entry. Use Save and New to immediately start another entry, or Save and Copy to duplicate the current entry as a template.
Locking and Unlocking Journals
Journal locking is an important accounting control that prevents changes to transactions posted on or before a specific date. When a journal is locked, no entries can be created, modified, or deleted within the locked period. This protects closed periods from accidental changes and ensures the integrity of financial reports.
To lock a single journal, navigate to the journal’s detail page and select Lock or Unlock from the Actions menu. In the modal that appears, check the Lock Journal box and select a Lock Date. The lock date defaults to the last day of the previous month, which is the most common choice when closing a monthly period. The lock date cannot be set to today or a future date, it must be yesterday or earlier.
Once locked, any attempt to create or modify an entry dated on or before the lock date will be prevented. Revela displays the lock date on the journal’s detail page so all users can see the current lock status.
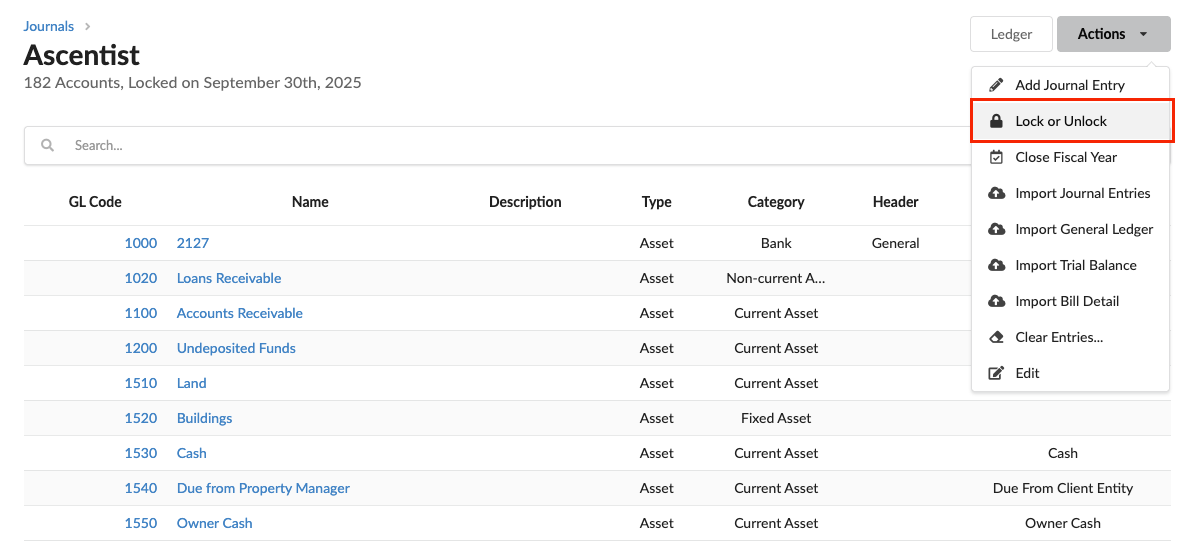
To unlock a journal, return to the same Lock or Unlock option in the Actions menu and uncheck the Lock Journal box. This removes the lock entirely, allowing entries to be posted to any date. Unlocking should be done carefully and only when corrections to a closed period are necessary.
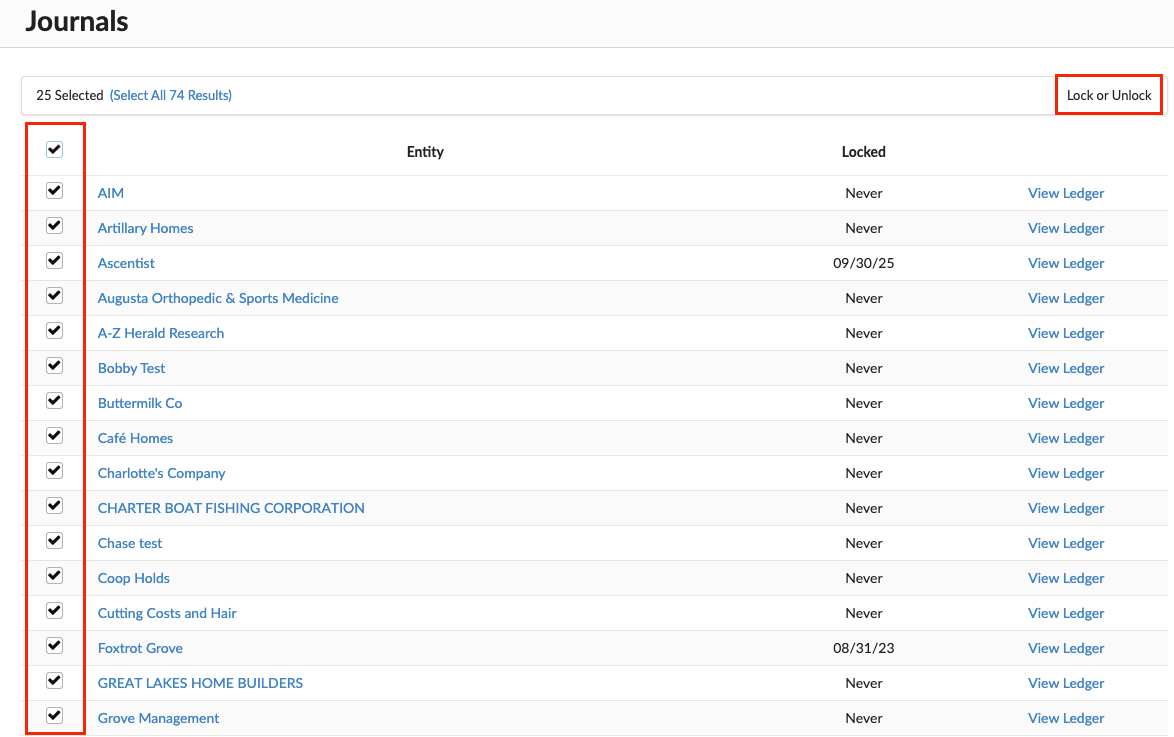
For organizations managing many entities, Revela supports bulk locking and unlocking. From the Accounting > Journals index, select multiple journals using the checkboxes and click Lock or Unlock in the toolbar. The bulk modal allows you to set or remove a lock date for all selected journals at once. This is processed in the background and a confirmation message appears when complete.
Note: If a journal entry is linked to entries in other journals, and any of those linked journals are locked, the entry cannot be deleted until the linked entries are unlinked or the other journals are unlocked. Linked journal entries commonly used for items such as property balance transfers and security deposit transfers where a journal entry is created instead of an invoice, and two journals are simultaneously being entered to.
---
Recording Payments on Receivables
When a tenant or other party pays a receivable invoice outside of the Revela system with a check, money order, or other offline payment method, you need to record that payment in Revela to keep balances accurate. There are two primary ways to do this, depending on the situation.
Marking an Invoice as Paid
The quickest way to record a payment against a single invoice is to use the Mark Paid option. Navigate to the receivable invoice’s detail page via Accounting > Receivables, then select Mark Paid from the Actions menu.
A modal form appears with several fields. The Payment Date defaults to the invoice date but can be adjusted. The Amount defaults to the remaining balance on the invoice. The Payment Method drop down lets you specify how the payment was received. Options include Check, ACH, Card Payment, Cash, Money Order, Owner Balance, Deposit Balance, and Credit. If the payment was made by check, you can enter the Reference Number for tracking. Depending on the payment method selected, you may also need to specify which Account (bank account) the funds were deposited into.
Note: If a bank account is not available in the dropdown selection for the Account, this is due to the fact that the parties on the invoice do not have access to the account you are trying to select. In this case, verify that the funds actually deposited into that account and if they did, reach out to Revela Support for further assistance.
Click Save to record the payment. Revela creates a payment record, links it to the invoice, and updates the invoice balance. If the payment covers the full balance, the invoice status changes to Paid.
Recording Income in Bulk
When you need to apply payments across multiple invoices for the same payer, use the Record Income option. Navigate to Accounting > Receivables and click Record Income. This opens a form where you first search for and select the payer (tenant, vendor, or other party).
Once a payer is selected, Revela displays all of their open invoices. You can select which invoices the payment should apply to, and Revela calculates the total. If the payer has prepayment credit available, the form displays the credit balance and gives you the option to apply it. Enter the payment details including the amount, date, and description, then submit the form to record the income.
This approach is especially useful during rent collection periods when tenants may pay multiple charges with a single payment.
---
Tips and Best Practices
-
Keeping your accounting workflows organized starts with consistent habits. Enter invoices promptly and use clear, descriptive names so that anyone reviewing the records can understand the purpose of each charge without additional context.
-
Take advantage of payment batches whenever you are paying multiple invoices at once. Batching reduces the chance of missed payments and gives you a single point of review before funds are disbursed. Always verify the bank account and payment method for each pair in a batch before processing, especially when using ACH or mailed checks where incorrect details can cause delays.
-
Lock journals at the end of each accounting period. This is one of the most effective controls available and prevents accidental modifications to finalized periods. The standard practice is to lock through the last day of the previous month once all reconciliation and adjustments for that period are complete. If you manage many entities, use the bulk lock feature from the Journals index to lock all journals at once.
-
When recording payments on receivables, use Record Income for multi-invoice payments and Mark Paid for quick single-invoice recordings. Always confirm the correct payment method and bank account to ensure your bank reconciliation process goes smoothly.